Escaping Dependency Hell: Modular Java Builds with Gradle
As software engineers and security practitioners, we often focus on the code itself—the logic, the vulnerabilities, the architecture. But the machinery that builds that code is often neglected. We’ve all seen it: a massive “Monolith” project with a 500-line build script, hardcoded version numbers scattered everywhere, and a “don’t touch it or it breaks” mentality.
Recently, I’ve been diving deep into Gradle, specifically looking at how to architect modern, modular Java applications. It turns out, if you treat your build logic like actual code (DRY principles, modularity), you gain massive benefits in maintainability and—crucially for us—security response time.
Here is a guide to building a modular Java application the right way, moving from “it works on my machine” to a professional build pipeline.
1. Under the Hood: The Lifecycle & The File Flow
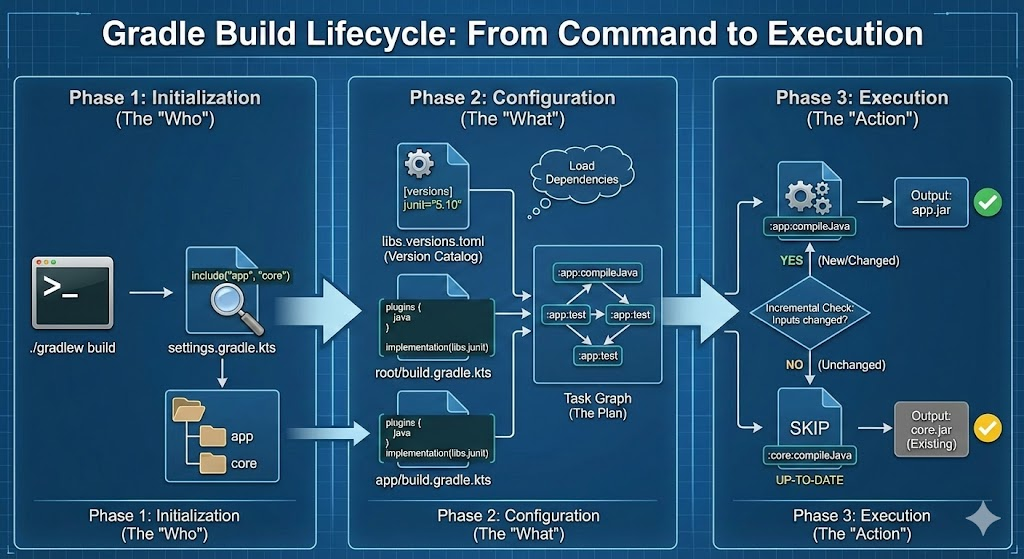
To master Gradle, you need to understand the sequence of events. When you type ./gradlew build, Gradle doesn’t just randomly guess which files to read. It follows a strict “Boot Sequence”:
Phase 1: Initialization
File read: settings.gradle.kts First, Gradle wakes up and reads this file. Its only job is to answer: “Which modules (sub-projects) are included in this build?”
- It finds
include("app", "core"). - It now knows it needs to look for folders named
appandcore.
Phase 2: Configuration
Files read: libs.versions.toml -> build.gradle.kts (Root & Modules) This is where the magic happens. Gradle constructs the “Task Graph” (the to-do list).
- The TOML File (
libs.versions.toml): Before it looks at any build scripts, Gradle loads your Version Catalog. It creates a map of variables (likelibs.junit) so they are ready to be used. - The Build Scripts (
build.gradle.kts): Gradle then runs the code inside everybuild.gradle.ktsfile in your project.- It sees
implementation(libs.junit)-> It looks up “junit” in the catalog loaded in step 1. - It sees
plugins { java }-> It adds the “compileJava” and “test” tasks to the graph.
- It sees
Critical Note: At this stage, Gradle is not compiling your code yet. It is just planning how to compile it.
Phase 3: Execution
Action: Running the Tasks Now that the plan is ready, Gradle executes the tasks you asked for (e.g., test).
The Power of Incremental Builds
Because Gradle separates the “Plan” (Configuration) from the “Action” (Execution), it can be incredibly lazy—in a good way.
Before running a task like compileJava, it checks: “Have the source files changed since the last time I ran this?”
- If yes: It runs the task.
- If no: It skips it entirely and prints
UP-TO-DATE.
In a modular project, if you only change code in the App module, Gradle knows it doesn’t need to recompile the Core module. On a large CI/CD pipeline, this feature alone can turn a 20-minute build into a 30-second build.
Why this flow matters for security?
Because the TOML file is read early (in Phase 2), it acts as a gatekeeper. You can enforce policy checks on that file before a single line of code is even compiled. If the TOML file contains a vulnerable version, you can potentially break the build immediately during the configuration phase, preventing the vulnerable code from ever being built.
2. The Problem: “JAR Hell” and The Monolith
In the old days, if you wanted to use a library like Log4j or JUnit, you downloaded a .jar file, dropped it in a lib folder, and prayed.
This is unmanageable. Modern tools like Gradle act as a dependency resolution engine. You ask for “Jackson JSON Parser,” and Gradle finds it, downloads it, and downloads everything Jackson needs to work.
But the default setup often leads to a “Monolith”—one giant folder where all your API logic, database code, and UI code live together. This makes testing slow and code reuse impossible.
3. The Solution: Modular Architecture
The first step to a clean build is splitting your application into Modules. Think of these as LEGO bricks.
Instead of one generic root project, a modern structure looks like this:
Plaintext
1
2
3
4
5
MySecureApp/
├── settings.gradle.kts   // The "Map" of the project
├── app/                  // The entry point (Main Class)
├── core/                 // Shared business logic
└── api/                  // Data models and interfaces
In your settings.gradle.kts, you simply link them:
1
2
rootProject.name = "MySecureApp"
include("app", "core", "api")
Now, the app can depend on core, and core can depend on api. If you change code in app, Gradle is smart enough not to recompile core. On massive projects, this saves minutes of compilation time.
4. The Security Win: Version Catalogs
As security professionals, we know the pain of “Vulnerability Management.” Imagine a critical vulnerability is found in a library you use (like the infamous Log4Shell). In a bad project, you might have to hunt down the version string "2.14.1" in ten different build.gradle files across different microservices.
Gradle’s solution is the Version Catalog (libs.versions.toml). It is a single source of truth.
gradle/libs.versions.toml
1
2
3
4
5
6
7
[versions]
log4j = "2.20.0"
junit = "5.10.0"

[libraries]
log4j-api = { group = "org.apache.logging.log4j", name = "log4j-api", version.ref = "log4j" }
log4j-core = { group = "org.apache.logging.log4j", name = "log4j-core", version.ref = "log4j" }
Now, every module in your project just references libs.log4j.api. When a patch is released, you update one line in the .toml file, and your entire fleet of modules is updated instantly.
5. Don’t Repeat Yourself: Convention Plugins
The biggest “aha!” moment in modern Gradle is realizing that build scripts are code, and they should follow software engineering principles.
If you have 10 modules, and you copy-paste the same Java configuration (Java 21, Repositories, Testing logic) into 10 different files, you are creating technical debt.
The pro move is to use buildSrc. This is a special folder where you can write “Convention Plugins.” You write the logic once:
buildSrc/src/main/kotlin/java-conventions.gradle.kts
1
2
3
4
5
6
7
8
9
10
11
12
13
14
plugins {
    java
    id("org.springframework.boot") apply false // Example
}

java {
    toolchain {
        languageVersion = JavaLanguageVersion.of(21)
    }
}

tasks.test {
    useJUnitPlatform()
}
Then, your individual modules become incredibly clean:
core/build.gradle.kts
1
2
3
4
5
6
7
plugins {
    id("my.java-conventions")
}

dependencies {
    implementation(libs.log4j.api)
}
6. Controlling the Flow: api vs implementation
A nuance often missed is how modules expose their dependencies.
implementation: “I use this library, but I’m keeping it a secret.” (Encapsulation).api: “I use this library, and if you use me, you get access to it too.”
If your Core module uses Guava for internal caching, use implementation. If Core returns a Guava List in a public method, use api. Getting this right speeds up compilation and prevents “leaky abstractions.”
7. Conclusion
Moving to a modular, convention-based Gradle setup initially feels like extra boilerplate. But the payoff is immediate:
- Faster Builds: Incremental compilation works better.
- Better Security: Vulnerability patching becomes a one-line change.
- Clean Code: Developers stop fighting the build tool and start trusting it.
If you are still writing 500-line build.gradle files, it’s time to refactor.